How To Create Bus In Pro Tools
Introduction
In this tutorial we will be looking at 'bussing', for those who are not familiar with the term, it basically refers to a number of signals being routed together so they can be adjusted or have effects applied to them as a group.
For this tutorial we will be working in the common production situation of routing a number of vocal tracks to a single fader so that effects and level adjustments can be applied in one place. While this tutorial in particular will reference using vocal tracks, the same process can be used within your Pro Tools session on anything you like whether it be to create a drum bus or even a sub-master fader to control the level of your mix before it hits the master fader…
Why Use Busses?
Bussing can have a number of benefits to your production, sessions that feature a lot of tracks can be hard to control so you need to use every trick possible to help you throughout the process. Imagine you have set the levels of each of your vocal tracks but you then decide that all of the vocals tracks need to be quieter within the mix, you can either go through the hassle of grouping the tracks together and then ungrouping them when you want to make individual adjustments, or, you could simply send them to a bussed fader from which you will have an overall control to make any group adjustments you require.
Take the same situation, you have a number of vocal tracks within a session but you feel that they all need a little reverb to help them sit a little better in the mix, rather than wasting valuable processing power applying the effect to each individual vocal track, you can simply bus send them to an effects channel and apply the effect once instead.
Now that we know what it is and how it will benefit your sessions, let's have a look at setting it up within Pro Tools…
I/O Setup
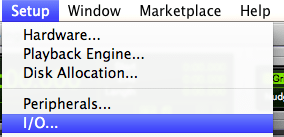
Let's start by creating and labelling the bus. As per usual, all things to do with routing within Pro Tools will involve starting work in the I/O Setup window which can be found under the Setup menu as shown below.
Navigate to the Bus tab at the top of the window which will display all available busses in your current session, it is worth mentioning at this point that the number of busses available will differ between systems, an expanded HD system will offer more busses than that of an LE system for example.
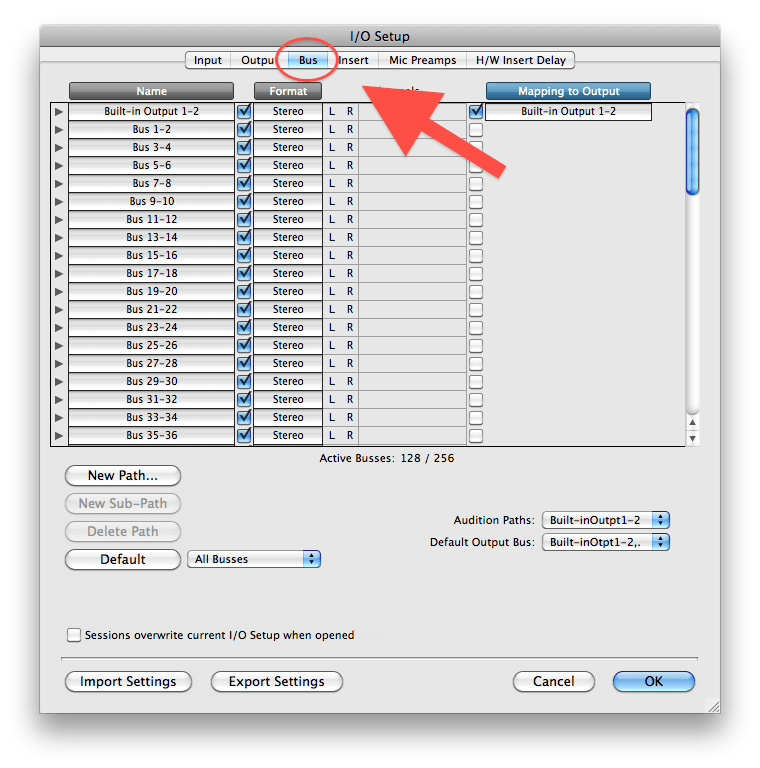
We will now create the bus, this can range from a mono bus all the way up to a surround bus (depending on your system) but for the purpose of this tutorial we will combine a number of panned mono vocal tracks so we will therefore use a stereo bus. Choose a spare slot in the bus window, assign its channels (they will be set to one mono track for the left and right sides by default – as below) and then label it appropriately.
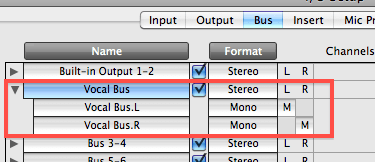
Quick Tip: The bus names can be changed by double clicking on the text field
Creating The Bus Input
We now need to create the track which will receive the signals we are going to send via the bus. For this we will use an Auxiliary Input Track; from the Track menu select 'New…' and then choose the settings as shown below.

Quick Tip: The new track dialogue window can also be opened using the shortcut Command_Shift_N (mac) Control_Shift_N (windows)

Please note that for this tutorial we are using a stereo bus so will therefore require a stereo auxiliary track, if you were working with a number of mono signals which were not panned, then a mono bus and mono auxiliary track would work fine.
Routing To The Bus
Now we are simply left with the task of routing the required tracks to the newly created aux track. Remember that bus that we set up right at beginning in the I/O setup window? Well this is where that will finally come in to play…
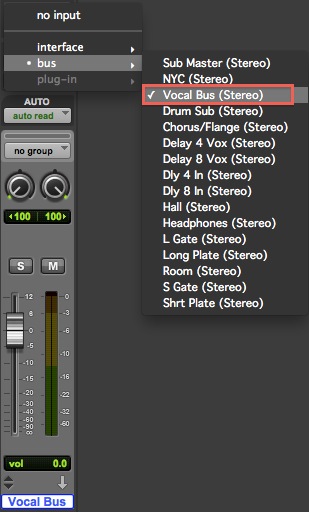
Set the Input of the newly created track to the bus you created earlier as shown below. This will mean that every track sent to the bus isrecieved on this track. For session management purposes, let's also rename the auxiliary track to 'Vocal Bus'.
Now lets look at sending our vocal tracks to the 'Vocal Bus' track.
As you can see in the screenshot below, I have four vocal tracks in this session which I have routed to the vocal bus, all I needed to do was change the output of the vocal audio tracks to the bus created earlier and the signals will now route through the vocal bus track.
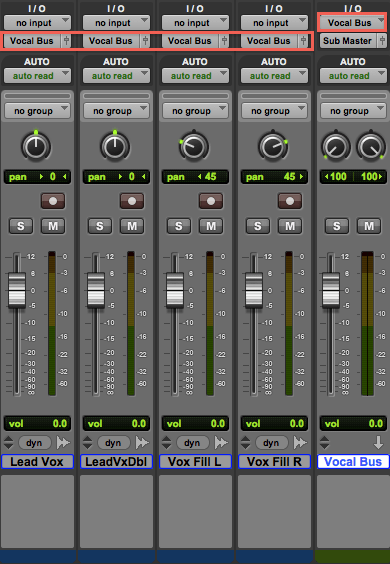
Quick Tip: You can quickly assign the output to a number of tracks by selecting them, and then setting the output of one of the selected tracks while using the shortcut Option_Shift (mac) Alt_Shift (windows).
Making Use Of The Bus
So there you have it you have created and applied a bus within Pro Tools, as mentioned at the beginning of this tutorial, this will now allow you to control the level of the combined bussed tracks from a single fader. You can also add effects to the auxiliary bus fader which will be applied to all sounds routed through it, it is worth mentioning that any insert effects placed on the original audio tracks which have been routed through the bus will be sent as well.
Final Words
We hope you have enjoyed this tutorial and that it will help you during your future productions. Please leave a comment below telling us how you have used bussing in your session or tweet us on our Twitter account.

How To Create Bus In Pro Tools
Source: https://www.protoolsproduction.com/busses/
Posted by: powersidowed.blogspot.com

0 Response to "How To Create Bus In Pro Tools"
Post a Comment